728x90
반응형

💡RelativeLayout
◾ LinearLayout일 때의 배치
◾ RelativeLayout일 때의 배치

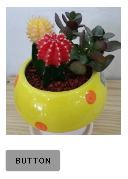
◾ RelativeLayout의 layout_alignParentBottom,layout_alignParentRight 속성으로 버튼 위치를 변경한다.

📝example03.xml
<?xml version="1.0" encoding="utf-8"?>
<RelativeLayout xmlns:android="http://schemas.android.com/apk/res/android"
    android:layout_width="match_parent"
    android:layout_height="match_parent"
    android:orientation="vertical">

    <ImageView
        android:layout_width="wrap_content"
        android:layout_height="wrap_content"
        android:src="@drawable/flower"
        android:layout_margin="20dp"
        />
    <Button
        android:layout_width="wrap_content"
        android:layout_height="wrap_content"
        android:text="BUTTON"
        android:layout_marginLeft="20dp"
        android:layout_alignParentBottom="true"
        android:layout_alignParentRight="true"
        android:backgroundTint="@color/grey"
        android:textColor="@color/black"
        />

</RelativeLayout>
📃RelativeLayout 배치 연습

📝test4.xml
<?xml version="1.0" encoding="utf-8"?>
<RelativeLayout xmlns:android="http://schemas.android.com/apk/res/android"
    android:layout_width="match_parent"
    android:layout_height="match_parent"
    android:padding="20dp">

    <TextView
        android:layout_width="wrap_content"
        android:layout_height="wrap_content"
        android:text="텍스트 1"
        android:background="#607EAA"
        android:textSize="30dp"
        android:padding="10dp"/>

    <TextView
        android:layout_width="wrap_content"
        android:layout_height="wrap_content"
        android:text="텍스트 2"
        android:layout_alignParentRight="true"
        android:background="#607EAA"
        android:textSize="30dp"
        android:padding="10dp"/>

    <TextView
        android:layout_width="wrap_content"
        android:layout_height="wrap_content"
        android:layout_centerInParent="true"
        android:text="텍스트 3"
        android:background="#607EAA"
        android:textSize="30dp"
        android:padding="10dp"/>

    <TextView
        android:layout_width="wrap_content"
        android:layout_height="wrap_content"
        android:layout_alignParentBottom="true"
        android:text="텍스트 4"
        android:background="#607EAA"
        android:textSize="30dp"
        android:padding="10dp"/>

    <TextView
        android:layout_width="wrap_content"
        android:layout_height="wrap_content"
        android:text="텍스트 5"
        android:layout_alignParentBottom="true"
        android:layout_alignParentRight="true"
        android:background="#607EAA"
        android:textSize="30dp"
        android:padding="10dp"/>

</RelativeLayout>
📃렐러티브레이아웃 - 입력 폼 만들기
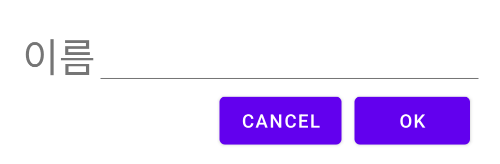
💁♀️내가 작성한 코드
📝test6.xml
<?xml version="1.0" encoding="utf-8"?>
<RelativeLayout xmlns:android="http://schemas.android.com/apk/res/android"
    android:layout_width="match_parent"
    android:layout_height="match_parent"
    android:padding="30dp">

    <TextView
        android:layout_width="wrap_content"
        android:layout_height="wrap_content"
        android:text="이름"
        android:textSize="30dp"
        android:id="@+id/tv1"
        />

    <EditText
        android:layout_width="match_parent"
        android:layout_height="wrap_content"
        android:layout_toRightOf="@id/tv1"
        android:id="@+id/et1"
        />

    <Button
        android:layout_width="wrap_content"
        android:layout_height="wrap_content"
        android:text="CANCEL"
        android:id="@+id/btn1"
        android:layout_below="@id/et1"
        android:layout_marginRight="10dp"
        android:layout_marginLeft="150dp"
        />

    <Button
        android:layout_width="wrap_content"
        android:layout_height="wrap_content"
        android:text="OK"
        android:id="@+id/btn2"
        android:layout_below="@id/et1"
        android:layout_toRightOf="@id/btn1"

        />

</RelativeLayout>💁♀️답안

<?xml version="1.0" encoding="utf-8"?>
<RelativeLayout xmlns:android="http://schemas.android.com/apk/res/android"
    android:layout_width="match_parent"
    android:layout_height="match_parent"
    android:padding="30dp">

    <TextView
        android:id="@+id/tv_name"
        android:layout_width="wrap_content"
        android:layout_height="wrap_content"
        android:text="이름"
        android:textSize="30dp" />

    <EditText
        android:id="@+id/et_input"
        android:layout_width="match_parent"
        android:layout_height="wrap_content"
        android:layout_alignBaseline="@id/tv_name"
        android:layout_toRightOf="@id/tv_name" />


    <Button
        android:id="@+id/btn_ok"
        android:layout_width="wrap_content"
        android:layout_height="wrap_content"
        android:layout_alignParentRight="true"
        android:layout_below="@id/et_input"
        android:text="OK"
        />

    <Button
        android:layout_width="wrap_content"
        android:layout_height="wrap_content"
        android:layout_below="@id/et_input"
        android:layout_toLeftOf="@id/btn_ok"
        android:layout_marginRight="10dp"
        android:text="CANCEL" />


</RelativeLayout>
◾ alignBaseline : 텍스트의 기준선을 맞춘다.

728x90
반응형
'App > Android Studio' 카테고리의 다른 글
| Android Studio - 구구단 레이아웃 만들기 (0) | 2022.08.02 |
|---|---|
| Android Studio - GridLayout (0) | 2022.08.02 |
| Android Studio - LinearLayout (0) | 2022.08.02 |
| Android Studio - xml과 자바 (0) | 2022.08.02 |
| Android Studio - 애뮬레이터 설치 및 Button 태그 (0) | 2022.08.01 |


댓글