◾ 객체로 만들 때는 중괄호{ }로 만든다.
◾ Map의 형태이다. (key, value)
var jobOld = "백수";
var obj = {name:"테스트",
    		age:51,
    		job:jobOld};
💡 jQuery
◾ 기본 문법
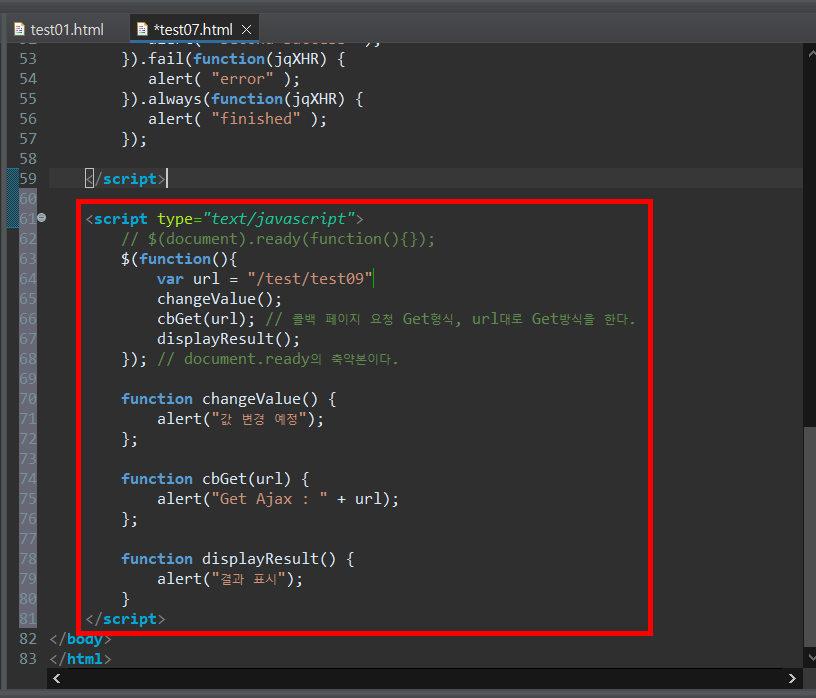
$(document).ready(function(){});◾ document.ready의 축약본이다.
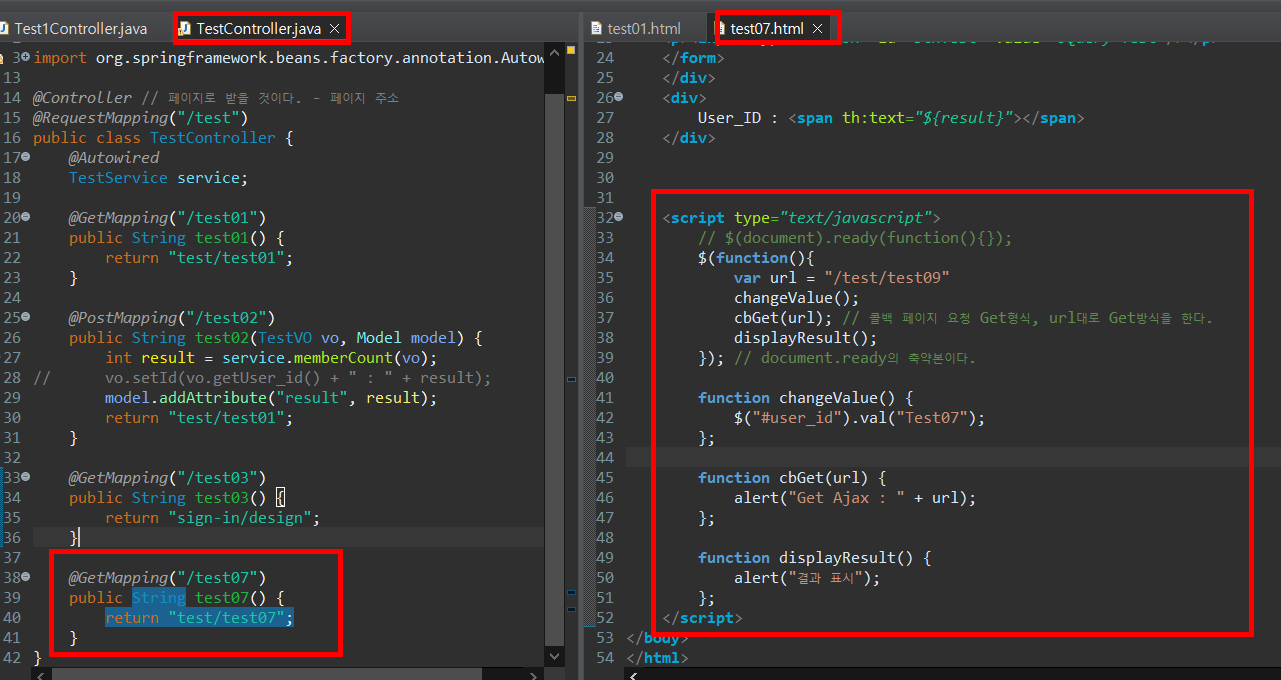
$(function(){});◾ jQuery를 통해 함수를 호출해서 alert 경고창을 출력한다.
◾ url은 임의로 정한 것

◾ Test1Controller.java에 있는 test07 은 주석처리하고, TestController.java에 test07을 추가한다.
◾ jQuery문 안에 jQuery문을 넣을 수 있다.

◾ 결과를 json으로 가져올 것이다. -- 객체는 모두 json
◾ 단순 문자면 text가 들어갈 수 있고 그걸 가져오는게 xml, html이다.var resType = "json";
◾ 서버에서 보내온 data가 넘어온다. -- 자신이 지정하는 것이 아니라 jQuery에서 지정해주고 넘겨준다.
function(data){ }
◾ cbGet() 수정
    	function cbGet(url) {
    		var resType = "json"
    		$.get(url,
    			function(data){
    				displayResult(data);
    			},
    			resType);
    	};

◾ displayResult() 수정
    	function displayResult(data) {
    		console.log("결과 표시 : " + JSON.stringify(data));
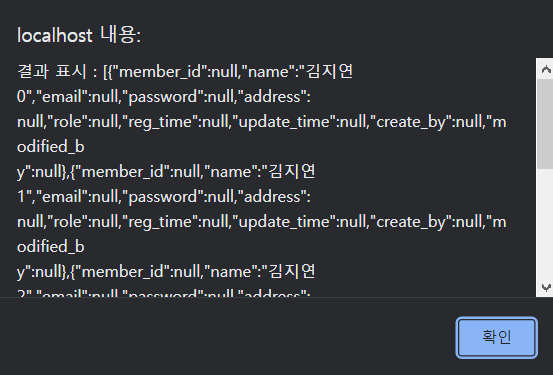
    		alert("결과 표시 : " + JSON.stringify(data));
    	};
◾ console.log를 통해 콘솔에 출력되는 것을 확인할 수 있다.

◾ 추가한다.
    		var resultStr = "";
    		for(var i=0; i<data.length; i++) {
    			resultStr = resultStr + " || " + data[i].name; // name값을 더하기 한다.
    		}
    		alert("결과 표시 : " + resultStr);
◾ alert 경고창을 이용해 내용이 출력된다.

📝test07.html
<!DOCTYPE html>
<html xmlns:th="http://www.thymeleaf.org">
<head>
    <meta charset="UTF-8">
    <meta http-equiv="X-UA-Compatible" content="IE=edge; chrome=1">
    <meta name="viewport" content="width=device-width, initial-scale=1.0">
    <title>Document</title>
    <script src="/jscript/jquery-3.6.0.js"></script>
</head>
<body>
    <div class="login_wrap">
    <h1>로그인</h1>
    <form class="login_f" method='post' action='/test/test02'>
    <p>
    <label for="user_id">ID</label>
    <input type="text" name="user_id" id="user_id" value="hunter"/>
    </p>
    <p>
    <label for="user_pw">PW</label>
    <input type="password" name="user_pw" id="user_pw" value="12345" />
    </p>
    <p><input type="submit" value="로그인" class="login_btn" /></p>
    <p><input type="button" id="btnTest" value="JQuery Test"/></p>
    </form>
    </div>
	<div>
        User_ID : <span th:text="${result}"></span>
    </div>


    <script type="text/javascript">
    	// $(document).ready(function(){});
    	$(function(){
    		var url = "/test/test09"
    		changeValue();
    		cbGet(url); // 콜백 페이지 요청 Get형식, url대로 Get방식을 한다.
    		// displayResult();
    	}); // document.ready의 축약본이다.

    	function changeValue() {
    		var txtUserId = $("#user_id");
    		txtUserId.val("테스트변경");
    	};

    	function cbGet(url) {
    		var resType = "json"; // 결과를 json으로 가져올 것이다. -- 객체는 모두 json
    		// 단순 문자면 text가 들어갈 수 있고 그걸 가져오는게 xml, html이다.
    		$.get(url,  // 사용자 요청 주소
    			// 콜백 함수 (data : 서버 전송 결과)
    			function(data){ // 서버에서 보내온 data가 넘어온다. -- 자신이 지정하는 것이 아니라 jQuery에서 지정해주고 넘겨준다.
    			// 함수가 실행이 됐을 때 만들어졌다가 함수가 끝나면 없어진다.
    				displayResult(data); // 콜백 안에서 호출한다. 매개변수를 전달해줘야지 data를 사용할 수 있다.
    			},
    			resType); // 결과 타입
    	};

    	function displayResult(data) {
    		console.log("결과 표시 : " + JSON.stringify(data));
    		// alert("결과 표시 : " + JSON.stringify(data));

    		var resultStr = "";
    		for(var i=0; i<data.length; i++) {
    			resultStr = resultStr + " || " + data[i].name; // name값을 더하기 한다.
    		}
    		alert("결과 표시 : " + resultStr);
    	};
    </script>
</body>
</html>
📝TestController.java
package com.shop.test.controller;

import org.springframework.beans.factory.annotation.Autowired;
import org.springframework.stereotype.Controller;
import org.springframework.ui.Model;
import org.springframework.web.bind.annotation.GetMapping;
import org.springframework.web.bind.annotation.PostMapping;
import org.springframework.web.bind.annotation.RequestMapping;

import com.shop.test.service.TestService;
import com.shop.test.vo.TestVO;
import com.shop.vo.SampleVO;

@Controller // 페이지로 받을 것이다. - 페이지 주소
@RequestMapping("/test")
public class TestController {
	@Autowired
	TestService service;

	@GetMapping("/test01")
	public String test01() {
		return "test/test01";
	}

	@PostMapping("/test02")
	public String test02(TestVO vo, Model model) {
		int result = service.memberCount(vo);
//		vo.setId(vo.getUser_id() + " : " + result);
		model.addAttribute("result", result);
		return "test/test01";
	}

	@GetMapping("/test03")
	public String test03() {
		return "sign-in/design";
	}

	@GetMapping("/test07")
	public String test07() {
		return "test/test07";
	}
}
◾ 필요한 걸 Map으로 묶어서 보내려고 한다.
◾ 값을 key로 해서 묶은 것을 List 형태로 여러 개의 값을 보낼 것이다.
◾ result타입을 HashMap으로 사용하지 않는 이유는 Map은 특성상 집어넣는 순서가 아니다.
◾ GET방식 (3개) url, 콜백, 타입(json, test...)
◾ POST방식 (4개) url, 데이터, 콜백, 타입
◾ ajax는 (1개) url, 데이터, 타입 다 받지만 1개만 받는다.
◾ 보내고 싶은 데이터는 객체로 선언한다.
◾ key값은 문자열만 가능하다.
◾ value값은 모든 Object(객체)가 가능하다.
◾ 요청을 받을 때 @RequestBody를 사용하는 이유는 json받겠다는 의미이다.
◾ 요청을 text로 받으면 파라미터 앞에 붙이면 된다.
◾ @RestController가 사용되면 모든게 텍스트로 읽어들이고 텍스트로 받아들인다.
◾ @Controller + @RequestBody -> @RestController
◾ 위에 @Controller를 적었다면 페이지 주소가 와야한다.
◾ 만약 클래스의 반환타입이 페이지 주소가 오지 않고 반환타입을 HashMap<String, Object>인 text로 돌려주려고 하면
서버에서 되돌려줄때 주소가 아니라 텍스트로 돌려주기 위해서는 @ResponseBody를 추가적으로 적어주어야한다.
◾ 페이지에 직업 url을 입력할 때는 Get방식밖에 확인이 안된다.
◾ API 개발을 보다 빠르고 쉽게 구현 할 수 있도록 도와주며, 개발된 API를 테스트하여 문서화 또는 공유 할 수 있도록 도와 주는 플랫폼이다
https://www.postman.com/downloads/
Download Postman | Get Started for Free
Try Postman for free! Join 20 million developers who rely on Postman, the collaboration platform for API development. Create better APIs—faster.
www.postman.com


'Front-End > JavaScript' 카테고리의 다른 글
| JavaScript - JQuery (0) | 2022.07.28 |
|---|---|
| JavaScript - 실습문제 (0) | 2022.07.11 |
| JavaScript - 기본 문법 (0) | 2022.07.11 |


댓글