728x90
반응형

📃 Event 객체


<html>
<head>
<script language="JAVASCRIPT">
function show_alert(flag) {
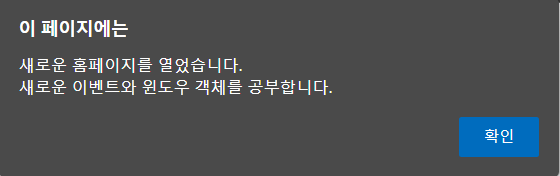
defaultStatus = "환영합니다. 이제부터 열심히 공부합시다..."
if(flag == true)
alert("새로운 홈페이지를 열었습니다.\n새로운 이벤트와 윈도우 객체를 공부합니다.")
else
alert("이제 공부를 다 하셨군요.\n축하합니다.");
}
function button_click(flag) {
switch(flag) {
case 1:
alert("버튼 1이 클릭되었습니다,\n'onClick' Event가 발생되었음...");
break;
case 2:
alert("버튼 2 위로 마우스가 왔습니다.\n'onMouseOver' Event가 발생되었음...");
break;
case 3:
alert("버튼 3을 눌렀다 놓았습니다.\n'onMouseUp' Event가 발생되었음...");
break;
case 4:
window.status = "버튼 4를 한 번 클릭하였습니다.";
break;
case 5:
window.status = "버튼 4를 두 번 클릭하였습니다.";
break;
}
}
var window1 = null;
function window_control(flag) {
switch(flag) {
case 'new':
window1 = window.open("information.html", "new_window", "height=300, width=700, scrollbars=yes, toolbar=yes, status=yes, resizable=yes");
break;
case 'close':
if(window1 != null) window1.close();
break;
}
}
</script>
</head>
<body OnLoad="show_alert(true)" OnUnload="show_alert(false)">
<h3>
<form>
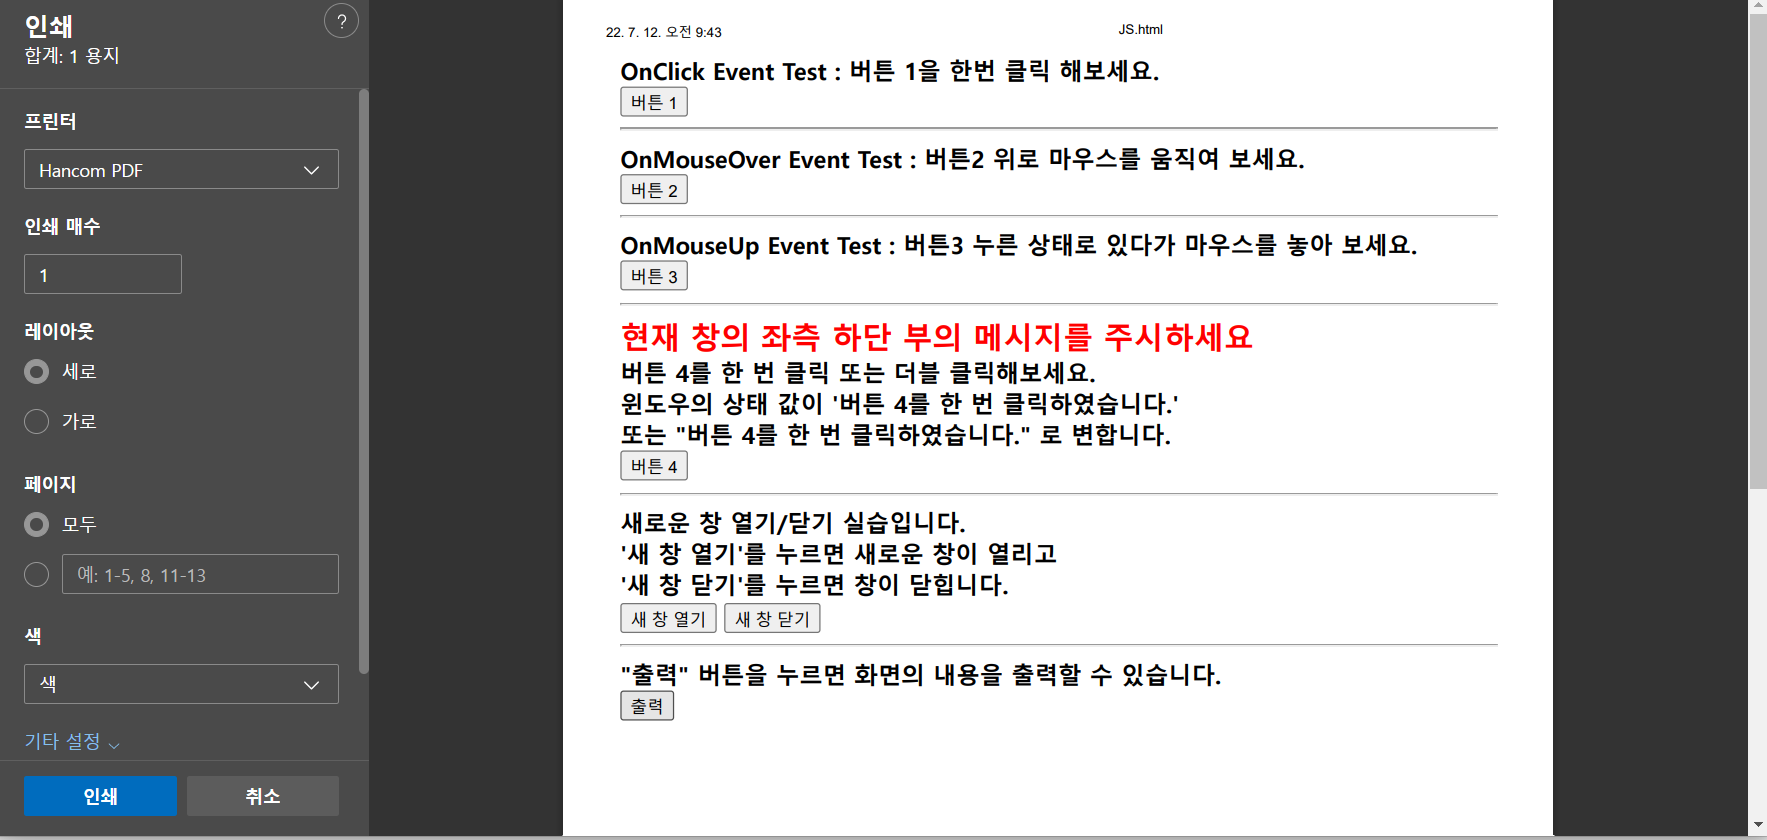
OnClick Event Test : 버튼 1을 한번 클릭 해보세요. <br>
<input type="button" value="버튼 1" OnClick="button_click(1)">
<hr>
OnMouseOver Event Test : 버튼2 위로 마우스를 움직여 보세요. <br>
<input type="button" value="버튼 2" OnMouseOver="button_click(2)">
<hr>
OnMouseUp Event Test : 버튼3 누른 상태로 있다가 마우스를 놓아 보세요. <br>
<input type="button" value="버튼 3" OnMouseUp="button_click(3)">
<hr>
<font size=5 color="red">현재 창의 좌측 하단 부의 메시지를 주시하세요</font><br>
버튼 4를 한 번 클릭 또는 더블 클릭해보세요.<br>
윈도우의 상태 값이 '버튼 4를 한 번 클릭하였습니다.' <br>
또는 "버튼 4를 한 번 클릭하였습니다." 로 변합니다. <br>
<input type="button" value="버튼 4" OnClick="button_click(4)" OnDblClick="button_click(5)">
<hr>
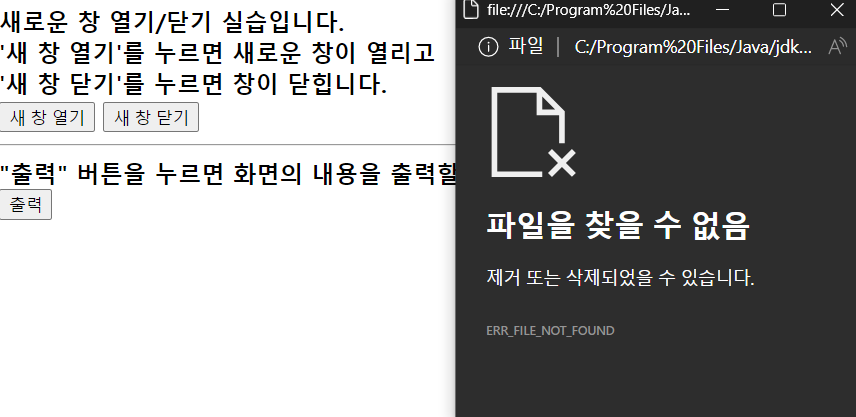
새로운 창 열기/닫기 실습입니다.<br>
'새 창 열기'를 누르면 새로운 창이 열리고<br>
'새 창 닫기'를 누르면 창이 닫힙니다.<br>
<input type="button" value="새 창 열기" OnClick="window_control('new')">
<input type="button" value ="새 창 닫기" OnClick="window_control('close')">
<hr>
"출력" 버튼을 누르면 화면의 내용을 출력할 수 있습니다.<br>
<input type="button" value="출력" OnClick="window.print()">
</form>
<br>
</h3>
</body>
</html>📃 자바스크립트 기본 구조(1)

<!DOCTYPE html>
<html>
<head>
	<meta charset="utf-8"/>
	<title>javascript-base.html</title>
	<script type="text/javascript">
		document.write("<h2>안녕하세요!</h2>");
	</script>
</head>

<body>
	<hr>
	<h1>자바스크립트 기본 구조</h1>
	<hr>

</body>
</html>
📃 자바스크립트 기본 구조(2)
💬 출력문 형식
◾ document :객체, write 메서드를 이용해서 내용 출력
◾ function message() : 함수명이 message라는 뜻
alert메서드에 의해 경고창을 띄운다.
body태그 안에 onload 이벤트를 넣으면 실행될 때 바로 함수를 실행되게 할 수 있다.
◾ <script type = "text/javascript"> : text형으로 응답받고 웹 브라우저에 응답하기

<!DOCTYPE html>
<html>
<head>
<meta charset="euc-kr" />
<title>javascript-head.html</title>
<script type="text/javascript">
function message() {
alert("이 메시지 상자는 onload 이벤트가 발생할 때 보입니다.");
}
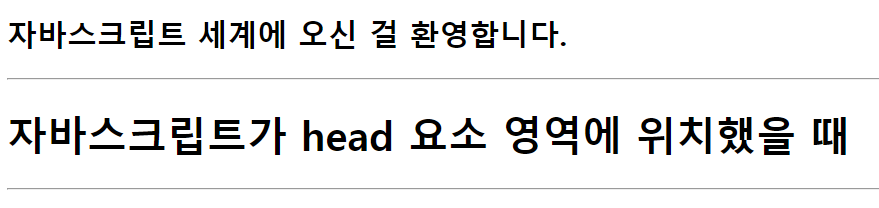
document.write("<h2>자바스크립트 세계에 오신 걸 환영합니다.</h2>");
</script>
</head>
<body onload="message();">
<hr><h1>자바스크립트가 head 요소 영역에 위치했을 때</h1><hr>
</body>
</html>📃 자바스크립트 기본 구조(3)

<!DOCTYPE html>
<html>
<head>
	<mta charset="UTF-8">
	<title>Insert title here</title>

	<script>
	window.onload = function() {
		var elements = document.querySelectorAll("div");
		for(var i=0; i<elecents.length; i++) {
			elements[i].addEventListener("click", function(event) {
				console.log(this.getAttribute("id"));
				event.stopPropagation();
			}, true);
		};
	};
	</script>
</head>

<body>
	<div id = "a">AAAAAA
		<div id = "b">BBBBBB
			<div id = "c">CCCCCC
			</div>
		</div>
	</div>
</body>

</html>
📃 onclick 이벤트

📝 change-color.js
var heading = document.querySelector("#heading");
heading.onclick = function() {
	heading.style.color = "red";
}
📝 test.html
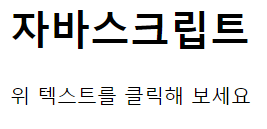
<body>
	<h1 id="heading">자바스크립트</h1>
	<p id="text">위 텍스트를 클릭해 보세요</p>

	<script src="change-color.js"></script>
</body>
📃 확인 창 띄우기 - confirm

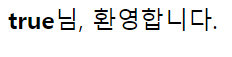
<script>
	var name = confirm("이름을 입력하세요.");
	document.write("<b><big>" + name + "</bing></b>님, 환영합니다.");
</script>
📃 사용자에게 입력받기 - prompt


<body>
	<h1>어서오세요</h1>

	<script>
		var name = prompt("이름을 입력하세요.");
		console.log(name + "님, 환영합니다.");
	</script>
</body>
📃 구구단

<h1>구구단</h1>
<script>
	var i, j;
	for(i=1; i<=9; i++) {
		document.write("<h3>" + i + "단</h3>");
		for(j=1; j<=9; j++) {
			document.write(i + "*" + j + "=" + i*j + "<br>");
		}
	}
</script>
📃 홀수 구구단

<h1>홀수 구구단</h1>
<script>
	var i, j;
	for(i=1; i<=9; i++) {
		if(i % 2 == 1) {
			document.write("<h3>" + i + "단</h3>");
			for(j=1; j<=9; j++) {
				document.write(i + "*" + j + "=" + i*j + "<br>");
			}
		}
	}
</script>
📃 while 문을 사용한 팩토리얼 계산


<h1>while 문을 사용한 팩토리얼 계산</h1>
<script>
	var n = prompt("숫자를 입력하세요.");
		var msg = "";

	if(n != null) {
		var nFact = 1;
		var i = 1;

		while(i<=n) {
			nFact *= i;
			i++;
		}
		msg = n + "!=" + nFact;
	}
	else
		msg = "값을 입력하지 않았습니다.";
	document.write(msg);
</script>
◾ 이벤트 - 정의
◾ 이벤츠 핸들러 - 처리
◾ name : 속성 명
◾ options : 속성값
◾ name="options" 체크 해놓게 설정해놓기
◾ onclick : 이벤트
◾ handler() 메서드
◾ onclick="handler()" 이벤트가 메서드에 의해 실행
◾ prompt 입력창
◾ alter 경고창
◾ comfirm 확인/취소
728x90
반응형
'Front-End > JavaScript' 카테고리의 다른 글
| JavaScript - JQuery (2) (0) | 2022.07.29 |
|---|---|
| JavaScript - JQuery (0) | 2022.07.28 |
| JavaScript - 실습문제 (0) | 2022.07.11 |


댓글